How to Upload Matlab Code to Raspberry Pi
Many (absolute) beginners get a Raspberry Pi as a gift, but have often trivial or no programming knowledge. Therefore I would similar to clear that hurdle in this series of tutorials and encourage learning to plan with the Raspberry Pi. The big advantage is that we tin can also write a hardware-related code, which allows u.s. to use the Raspberry Pi'southward GPIO pins.
We use Python as the programming language, since it is one of the easiest languages to larn for beginners and in that location are also unremarkably the about references and examples available.
Required Hardware Parts
A notation in advance: The tutorial series is intended to make it easier to get started with programming on the Raspberry Pi, but should not be taken every bit an independent course. A volume is very useful for deepening your knowledge and looking things upwards. In particular, I tin recommend one of these two books for learning:
- pure Python nuts: Python Crash Grade (Eric Matthes )
- Programming the Raspberry Pi: Getting Started with Python (Simon Monk)
Hardware
To become started, we need the following hardware parts:
- Raspberry Pi (the model doesn't matter – I don't recommend Model Zero)
- micro SD card (min. viii GB)
- Keyboard
- Mouse
- HDMI cable
- USB power adapter + micro USB cable
- WLAN adapter if necessary
Grooming
Before we start programming, we need to take a few steps to set the environment. First of all, information technology is necessary that the Raspberry Pi gets an operating arrangement. The Raspberry Pi Foundation provides the then-called Raspbian OS, which we need to download. And then nosotros transfer the included file to the micro SD card. You can find detailed instructions here:
Transfer Raspberry Pi Raspbian OS to an SD Card (Windows)
After the image is on the SD card, we insert it into the Raspberry Pi. As soon as the keyboard, mouse and display are continued via HDMI cablevision, we can start it. This is done just by connecting the micro USB cable and connecting it to ability. The display should now lite up and a few lines of lawmaking should appear on a black background.
Shortly afterwards, the startup process is complete and we see the desktop:

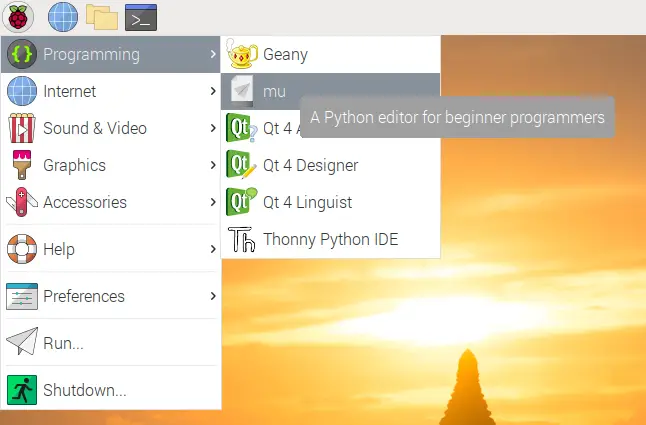
We now open the Python console, in which we tin immediately enter program lawmaking. Open up this by firstly clicking the Raspberry Pi symbol in the summit left and and then nether Programming on "mu". If you don't meet this pick, you tin either install it (Preferences -> Recommended Software) or also use the Thonny Python IDE.
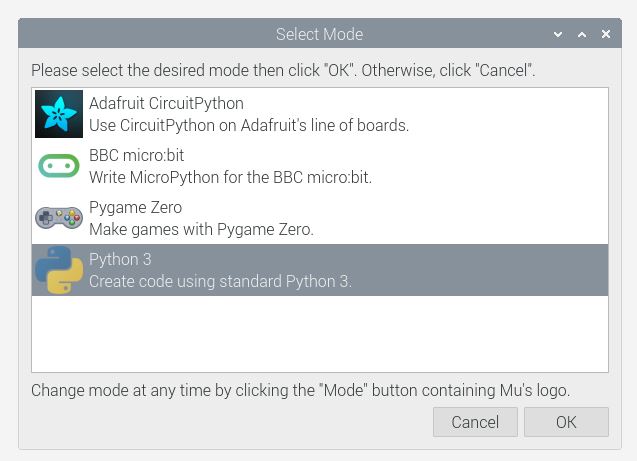
First, you are asked for the Editor Way. Select Python iii.
The Python console now opens and it looks like this. We will write our code in this:
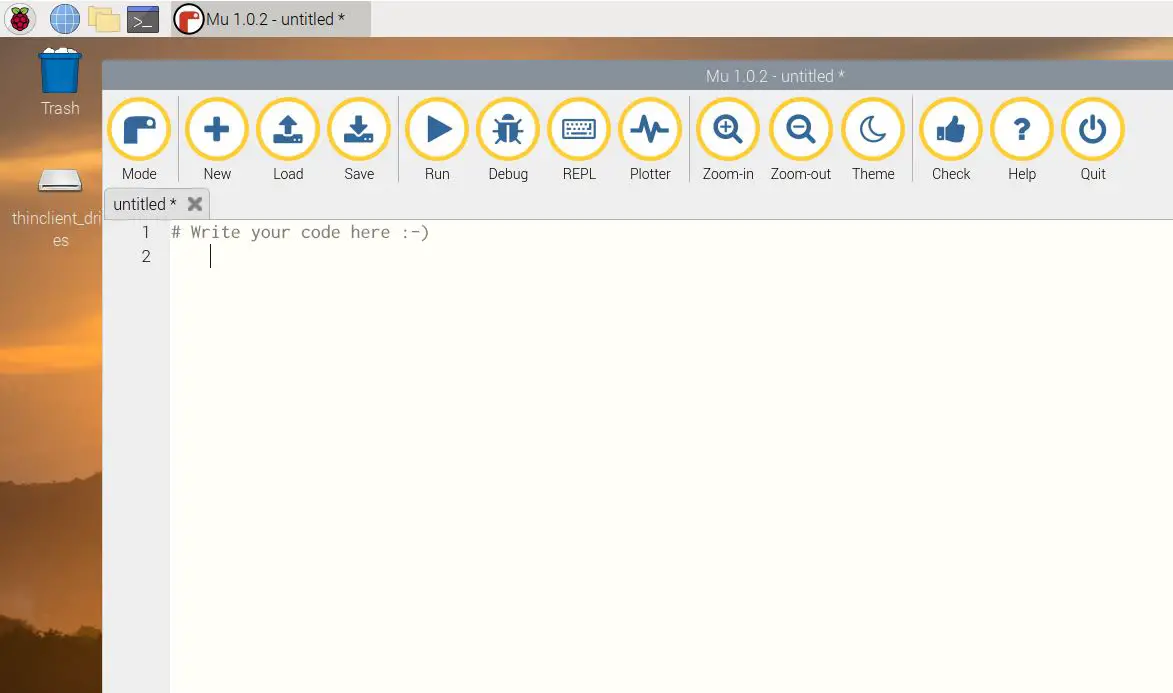
Click on "REPL" on the Superlative bar, so that we can come across our output immediately.
If you are wondering why we took Python 3 and whether you tin can use Python 2, the answer is that both are possible. At that place are a few differences between those two versions, but they do not matter to get started. The code we write is executable on both versions.
If you are interested in the differences in detail, you tin read this article.
Howdy Globe Plus
Enough words, we're starting! In the console we want to first with a typical "Hello World" application. All you need to do is type in the post-obit line and send it with Enter:
print("Hullo World") With that we go our first output:

Print is the part that we call here. Within the brackets, we give parameters which the office needs. Since it is a grapheme string, we have to put as well the quotation marks at the first and cease, since other words are interpreted as variables, which we will come to in a moment.
At present information technology is quite dull to only print out a judgement. Therefore, we now create a and then-called variable. This is sort of a placeholder that tin take on different values and tin can be addressed via its proper name. Would you like an case? Here:
number = 7 print(number)
The advantage of variables is that we tin can easily overwrite their value. In the next example we create two variables and add the starting time to the second (and save the outcome in the 2nd variable – so nosotros overwrite it):
number_1 = 7 number_2 = iii.v number_2 = number_1 + number_2 print(number_2)
Just be careful: In improver to (integer) numbers, variables can also e.g. contain strings. An add-on is not possible here and would pb to an error.
By the way: The variable tin can be named as you wish, but must non begin with a number. Also, no special characters (apart from the underscore) may be used. At that place are too no two variables that can have the same name.
Comments
Another useful feature is comments that explicate the code in case someone else or you lot await at the code again later. Such comments are available in every programming language and can also be used to "mute" parts of the code so that they are not executed. That process is called commenting out.
In Python, comments brainstorm with a hashtag (#). The remainder of the line is then no longer executed. Here's an example:
# This is a comment print("Line1") # some other comment #print("Line2") print("Line 3") Every bit you can see, only line ane and line 3 are output considering we commented out the middle command.
Offset Queries
As already said, variables tin can have different values. So that we tin query them again, there is also a possibility for this. We can do this withif .. else. Here is an example:
number = 7 # assuming an unknown number is added here if number == 10: impress("number = 10") elif number < x: impress("less than 10") else: print("greather than 10") In that location is a lot to consider hither:
- At the end of the
if,eliforelseline there must be a colon because we are saying that the condition has ended. We tin can likewise link several atmospheric condition. - For queries, the following options exist
==(equality),<(smaller),>(larger),<=(smaller/equal),>=(larger/equal). When checking for equality, the simple equal sign must not be used, since this merely assigns variables. - The commands that are executed if the condition is true must be indented with spaces. Everything must exist on the aforementioned level or indented every bit. The default is four spaces to indent.
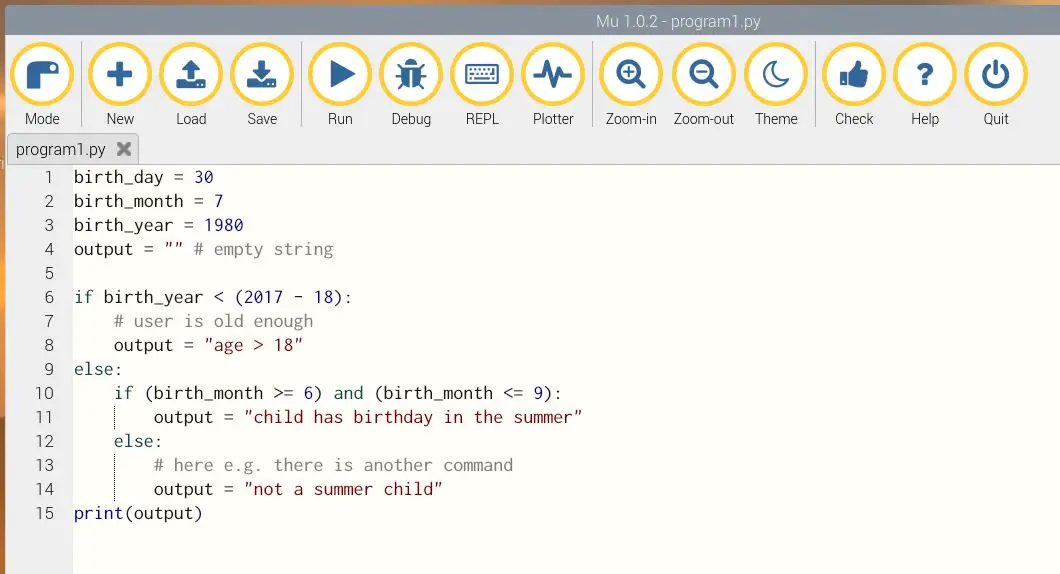
I will at present evidence an extended example so that the syntax is a bit easier to empathise (fictitious person with a date of birth on July xxx, 1980):
birth_day = 30 birth_month = seven birth_year = 1980 output = "" # empty string if birth_year < (2017 - 18): # user is old enough output = "age > 18" else: if (birth_month >= 6) and (birth_month <= 9): output = "child has birthday in the summer" else: # hither e.1000. there is another command output = "not a summer child" print(output)
As you lot can see, information technology is very easy to nest queries. Information technology is only important that yous always proceed an middle on the indentations, otherwise, you will get an mistake (or the programme volition be executed incorrectly).
Loops
Now we go one stride further and wait at so-chosen loops. Basically, these represent unproblematic repetitions, whereby after each repetition (also chosen iteration) it is checked whether the specified condition is (withal) true.
The two types of loops are called ForLoop and WhileLoop. The while loop initially checks whether the query is true. Here'due south an example:
x = 0 while x < 5: print(x) ten += 1
In each repetition, it is initially checked whether x is less than 5 and if so, the indented office is executed. Nosotros output the number once and then add 1 to x. The numbers 0 to 4 are thus output.
In dissimilarity, the construction of the for loop is a piffling different. In Python, its definition is for .. in .. : where the first parameter is a variable (which is bachelor within the loop) and the second parameter is e.g. a listing. We have the following options for outputting the numbers from 0 to 4:
# start alternative for number in range(5): # range(x) outputs the numbers from 0 to x-one print (number) # second alternative for number in [0,1,2,3,4]: impress (number)
As you lot can come across, a for loop is better for like shooting fish in a barrel counting.
Outsourcing the Code in Files
As a final step of this tutorial, I want to bear witness you lot how to write the lawmaking into a file and execute it. Since you usually write whole blocks of lawmaking, you also want to have them executed sequentially. The so-chosen compiler, which translates the readable (human-understandable) code into machine lawmaking, can execute individual commands or entire files.
Click on the folder symbol in the navigation bar and right-click on the gratis infinite. Nether "Create New"> "Empty File" y'all tin can create a new file:

Proper name them e.g. "program1.py" (without quotes). Don't forget the ".py" extension, so information technology is clear that it is a Python script.
Y'all tin can open up the created file with a double click. Here you can write your code and save information technology via the menu. I pasted the code from above:
After saving, we tin can already start the file. This happens via the terminal/console. To do this, click the icon to the correct of the folder in the taskbar. A black window opens in which you can enter something.
Here you write the post-obit (ship with Enter):
python3 program1.py
The program will now run from start to finish. All queries are executed until the program has reached the stop where there are no further commands. Then it terminates.

This was information technology with the first part of my piddling overview to get started with programming with the Raspberry Pi. In the side by side part, we will focus on reading and writing the GPIO pins, which we tin utilize to control electronic components such as LEDs and read buttons.
PS: No Python code can be seen in the entry picture show since information technology should only be a symbol movie 🙂
PPS: Comments/suggestions (especially from beginners) are welcome then that I can adapt the other parts accordingly.
Source: https://tutorials-raspberrypi.com/learn-how-to-program-on-the-raspberry-pi-part-1-introduction/
0 Response to "How to Upload Matlab Code to Raspberry Pi"
Post a Comment